

‘Cabinet Oblique’
In Cabinet oblique the scale (depth) is halved whilst in Cavalier
oblique the depth scale is the same as in the X and Y directions.
In Cabinet oblique the scale (depth) is halved whilst in Cavalier
oblique the depth scale is the same as in the X and Y directions.
One remaining drawing conventions is Oblique drawing –
In this convention the angles used are 45 degrees and 90 degrees. The only difference between the two named styles is in the scale of the dimension going away from the viewer.
This first example is Cavalier Oblique and shows the full scale (1:1) in the axis
In this convention the angles used are 45 degrees and 90 degrees. The only difference between the two named styles is in the scale of the dimension going away from the viewer.
This first example is Cavalier Oblique and shows the full scale (1:1) in the axis
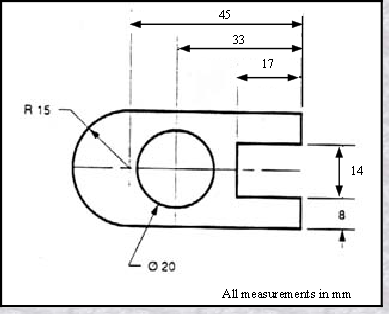
This drawing (shown to the left) is symmetric about the horizontal centre-line.
Centre-lines are chain-dotted and are used for symmetric objects, and also for showing the centre of circles and holes.
Drawing dimensions should generally be done directly to the centre-line, as shown on the left. In many cases this method
can be clearer than just dimensioning
between surfaces.
Note again that the measurements show only numbers. The statement at the bottom of the drawing identifies that these numbers are the dimensions in Millimetres.
Centre-
between surfaces.
Note again that the measurements show only numbers. The statement at the bottom of the drawing identifies that these numbers are the dimensions in Millimetres.

Engineering Drawing and Sketching
for GCSE
for GCSE


A Simple Guide to Dimensions ... Continued ...
With the left side of the block composed solely of "radiuses" (radii) - as shown here, we break our rule that we should not duplicate dimensions. The total length is known because the radius of the curve on the left side is given. Then, for clarity, we add the overall length of 60 and we note that it is a reference (REF) dimension.
This means that it is not really required.
Somewhere on the paper, usually the bottom, there should be placed information on what measuring system is being used (e.g. inches and millimetres) and also the scale of the drawing.
With the left side of the block composed solely of "radiuses" (radii) -
Somewhere on the paper, usually the bottom, there should be placed information on what measuring system is being used (e.g. inches and millimetres) and also the scale of the drawing.
‘Oblique’ Drawing ‘Cavalier Oblique’ and ‘Cabinet Oblique’

